Thursday, November 20, 2008

Canon Photo5 - An Artistic Evolution?

In the last few weeks I’ve spent a lot of my spare time thinking about, planning, shooting, editing and uploading photos for the Canon Photo5 competition. The challenge of this competition has stretched me artistically in a way that I never even intended to happen.

The Competition
The Photo5 competition is where Canon send you five everyday objects in the mail and you are challenged to produce and submit one photo containing each image. To make it exciting, you don’t know what the objects are until they arrive and, even better, Canon puts up $5,000 worth of Canon products for the best image of each object.

The objects this year were:
. a ribbon
. a crayon
. a cocktail umbrella
. a tealight candle; and
. a small bottle of bubbles.

I believe that this year 10,000 boxes were sent out and over 1,300 photos have been submitted for each object. What’s more, Canon have enlisted David Anderson and Montalbetti+Campbell as judges – world-class photographers who I anticipate will have huge expectations for the images that they’re prepared to present as finalists.

Creating My Entries
In retrospect, I’ve realised that my photography up until now has always been subject-focussed; I would see a subject that I thought was visually interesting and so I would take a photo of it. This had often turned out pleasing results. With the Photo5 objects, however, I was facing the challenge of taking photos of subjects that were visually uninteresting, even trivial.

I realised pretty quickly that these objects wouldn’t make an interesting photo. To turn them into something engaging, I needed to come up with some theme or story that would make an interesting photo and that could incorporate each object. This is probably painfully obvious to anyone who listened in Art class, but to someone whose best subject was Physics, this was a major revelation for the way I take photographs.

I got pretty excited about this new concept of capturing themes. The consequence of my excitement was that I suddenly became open to trying all kinds of things I’d never tried before: I spent a whole lunchtime squatting in an alley photographing a wall; I asked one of my work colleagues to model for a photo; I tried (with fairly poor results) to turn my living room into a studio; I stayed up until 2 in the morning trying to do things in The GIMP that I’d only ever read about. I spent hours on each photo because I was excited by the idea of using photos to say something rather than just show something.

Results
You can see the photos that I entered into the competition by clicking on the thumbnails below, but they’re not the sum total of what I achieved by entering the competition. The challenge it presented has done more to advance my art than any book I’ve ever read or any gear I’ve ever bought. In fact, it’s caused me to consider how few things that I’ve created up until now have actually been art.

While I'm really impressed by what I was able to create, statistically there was only ever a 5 in 1300 chance that any of my images will be picked to be a finalist, so I wasn't surprised when I wasn't. The real win for me has been finally realising that photography is about more than just the visual subject; it’s about the story.

Thanks
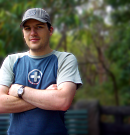
Lastly, I have to say some thankyous: to Mark, who entertained my bizarre request of modelling for a photo on a city street at lunch time; to Bec, for answering my urgent call to borrow a lab coat; and to my lovely wife, Amanda, for her modelling, her patience, and for refusing to believe that I had gone mad despite much evidence to the contrary.
Cheers, guys – I couldn’t have done it without you.

I hope you enjoy my photos.

Grazer


Thread of Life


Immaturity


homo workaholicus


Summer Love


Making Haloes


Thursday, September 11, 2008

Do You See What I See?

While at work today, I entered this image of Union Lane in Melbourne into a competition on RedBubble. I thought I should have a quick look at the full-size image to make sure it was the one I wanted to enter.

When I brought it up, the colours just looked stupid. In particular, the whole left-hand third of the image was a single shade of orange, and not even a nice shade.
It made me think "Why did I even upload this?"

Someone left a comment on the image later in the day, so I opened it up at home to read the comment. And BOY does that shot look so much better at home!

Is it just because I'm not at work and so I'm feeling better about the world?
No.

Is it because I have some awesome $10,000 monitor at home?
No. (Because I don't.)

The reason is simple, but important: Monitor Calibration.

At home, I use an X-Rite i1 Display 2 to calibrate the way my monitor displays colours. It helps me to adjust the brightness, contrast, RGB whitepoint (color temperature) and gamma curve of my CRT monitor so that what I see on the screen is a precise representation of the data in the image. At work (where, I must admit, colour correctness is not a high priority), there is no such calibration of our LCD monitors. The result? Great sadness.

PUBLIC SERVICE ANNOUNCEMENT:
CALIBRATE YOUR MONITOR

Now, I'm not a professional photographer. Far from it. But if you're going to play around with the colours of your photos at home and then send them to a professional printer, you really, really need to calibrate your monitor. You must. To not do so is just silly. Your editing is quite possibly doing more harm than good.

In fact, even if you just want to appreciate your own and other people's photos properly on your home computer, I highly recommend that you get an affordable monitor calibration device and get your monitor into shape!
My experience at work today showed that an uncorrected monitor can flat-out ruin what is otherwise a lovely image.

Monitor Calibration 101
For the newbies: What happens if you don't calibrate your monitor? Well, imagine there's a piece of plastic between you and your monitor and that this plastic is light yellow, or light blue, or light green. You can still see everything on your monitor, and it appears to have all the colours of the rainbow, but something isn't quite right. This is what an uncalibrated monitor looks like.

In fact, your eyes will slowly adjust to the fact that everything on your monitor seems to have a yellowish or bluish or greenish tone (this is called a "colour cast") and your brain, which is really only interested in what a colour looks like compared to the other colours next to it, will effectively subtract the cast from your vision.

But if, while this piece of plastic is in the way, you start editing the colours of your photos, you will probably make different decisions - wrong decisions - compared to what you would make if it weren't there.

For example, if your monitor has a green cast, you might decide that Aunt May's skin tone is a little green, so you adjust the tone of the photo to represent her typical, pinkish tone. But because your monitor isn't calibrated, the colour you see on the screen - the one you think you've changed Aunt May's skin to - is not actually the colour stored in the image. It is the colour in the image plus the green tone of the cast. It's likely - almost certain - that you overcompensated for the colour cast when you adjusted the colour in the photo. If you were to get this photo printed at the local mini-lab, you would probably find that Aunt May's skin is so red that she looks like she has a third-degree sunburn.

So what does monitor calibration do? How does it work?

When you calibrate your monitor, what you effectively do is let the computer measure the colours that your monitor is displaying. This is done by attaching a calibration device to your monitor and running the software that came with the device. By doing this, the computer can detect the colour cast because it tells the monitor to display white, but then measures that it shows a greenish shade of white.

Once your computer knows the natural colour cast of your monitor, the computer can change the colours that it sends to the monitor to compensate for the cast, so that what you end up seeing is the pure, unadulterated colour from the image.

So, do your Aunt May a favour:

Calibrate Your Monitor Today.

Copyright (c) 2008 Graham Lea. All rights reserved.

Friday, July 25, 2008

The Most Important Things to Know About Photography : Focal Length = Angle

Starting In Photography?

After I told a good friend of mine that I'd bought a new camera, he said that he was keen to buy a "proper camera" and try to take some decent photos. He told me that he assumed just buying an expensive camera and using it in Auto mode would probably produce better pictures than a point-and-shoot (which is true) but that to get really good photos you probably have to learn all kinds of photography concepts (also true) and that there was so much stuff to learn that it was hard to know where to start (true again).

So, to help him out, and anyone else who wants to enter amateur photography, I'm going to share my tips for where to get started if you know almost nothing about photography other than how to use a point-and-shoot camera. You won't become a pro by the reading my thoughts (durh!), but you should feel less like a dunce, and you'll hopefully have an idea of what things you might want to do.

Focal Length, Aperture, Shutter Speed

I think these are the three most important things about photography, so it seems sensible to explain them first because it will make other things easier to explain.

We'll look at focal length first.

Focal Length = Angle

I'm writing about "The Most Important Things to Know About Photography", and Focal Length is the first property of your camera that I want to draw your attention.

In photography, 'focal length' is a property of the lens you are using that determines what angle of the scene in front of the camera will be captured in your picture. Basically:

  • The smaller (or "shorter") the focal length, the wider the angle.
  • The larger (or "longer") the focal length, the more narrow the angle.

Some lenses only have a single focal length, and these are called "prime" lenses. Most people are familiar with lenses that have a range of focal lengths, which are called "zoom" lenses. When you adjust the "zoom" on a point-and-shoot camera, i.e. you zoom in or you zoom out, what you are actually doing is changing the lens' focal length, decreasing the focal length when you zoom out and increasing it when you zoom in.

Being able to choose the focal length to use in a photograph allows the photographer to change how much of the subject or subjects will be in the frame. If they were shooting a wide, sweeping landscape, they would most likely use a short focal length (small number, wide angle) so that could capture as much of the "expansive" feel of the land as possible. However, if they were trying to capture a close-up photograph of someone on the other side of a large room, they would need to use a long focal length (larger number, narrow angle).

Focal Length Categories

Focal lengths are typically broken into the categories: Wide, Standard and Telephoto, with some adding Ultra-Wide and Super-Telephoto.

The "Standard" range is so called because it is similar in angle to what our eyes would normally see when looking at a scene.

"Wide", which is smaller focal lengths than "Standard", means a wider angle than we can see without moving our eyes. Wide lenses allow photographers to show their audience, in a single photo, a scene wider than they could see themselves if they were standing in the same place as the camera.

"Telephoto", which is larger focal lengths than standard, means a smaller angle than we would normally see with our eyes, but Telephoto also means the subject will be magnified and so will show details our eyes may not have seen from the same distance.

Ultra-Wide and Super-Telephoto are obviously just extensions of their similarly named compatriates.

So, what are the actual lengths in each category? This is a harder question than it used to be, but I'll keep it simple to start with. If you are using a 35mm film camera or a professional or semi-professional "Full Frame" digital camera (which means it has a sensor the same size as 35mm film), then Standard is around 50mm, Wide is anything less than about 35mm and Telephoto is anything more than about 80mm. However, most people aren't using these cameras.

Sensor Size and Effective Focal Lengths

If you have a more affordable digital SLR camera then everything changes. Because the size of the sensor in your camera is smaller than 35mm film, the angle of view it will capture from a lens with a specific focal length is different. These cameras have a property describing how different the angle is, and this is called the "focal length multiplier".

Assuming your camera has a "focal length multiplier" of 1.6 (most DSLR cameras are either 1.6 or 1.5) then the Standard focal length is about 32mm (as opposed to 50), Wide is anything less than about 22mm and Telephoto is anything higher than about 50mm. I can't explain this any more without getting technical about what the "focal length multiplier" means, and you don't need to know that right now. However, you may go far if you can remember this: the effective focal length of a lens is equal to the actual focal length of the lens multiplied by your camera's focal length multiplier.

Now, the focal length does affect more aspects of your photograph than just the angle, but to keep it simple for the moment it's easiest to remember that you chose the angle your photo will cover by choosing a focal length.

Key Points:

  • Focal Length = Angle
  • Small focal length = "shorter" = wider angle
  • Large focal length = "longer" = more narrow angle
  • Effective focal length = Actual focal length x Focal length multiplier
That's it for Focal Length. Make sure you come back (or subscribe to the feed) to read about more of the Most Important Things to Know About Photography. Next up: Aperture and Shutter Speed.

Copyright (c) 2008 Graham Lea. All rights reserved.

Tuesday, June 24, 2008

Why You Shouldn't Buy a Canon 450D (Digital Rebel XSi)

Or, more correctly stated: "Reasons You Might By a 450D That Aren't Necessarily Good Reasons"

You Foolish 40D Owner! You Just Bought an Over-Priced 450D!

Since Canon announced the 450D in January, there's been a lot of online digital photography forums flooded with recent buyers of a Canon 40D ruing their misfortune. After all, the 450D includes almost all of the features that made the 40D better than the 400D. Doesn't it? Or did you miss something?

Well, yes and no. Let's review the features that weren't in the 400D, are in the 40D, and have now been copied to the 450D: you've got Digic III, 14-bit, Highlight Tone Priority, spot metering, 3" LCD, Live View. All of which are great features.

But review the reasons I bought a 40D: Metal body, bigger grip, room to grow as a photographer. I don't think the 450D has any of these features that were my deciding factors. Besides which, I'd been doing my pre-purchase research for about 4 months and by the time the 450D was announced I was ready to buy a camera and not ready to wait another three months.

But, But... 12 Megapixels!

Yes, the 450D has 12.2 megapixels over the 40D's 10.1. That should make it the better camera, right? Well, before you answer that question, you need to know what those two extra megapixels are going to get you and when you're going to use them.

So, what DO the two extra megapixels get you? They get you an image that's 20% bigger, don't they? Well, it depends on what you mean by bigger. Your image will be 20% larger by area, but because that increase has to be shared between the horizontal and the vertical dimensions, you actually end up with an image that's a little under 10% wider and taller (see the graphic).


Well, 10% is still 10% isn't it? But when are you going to use that 10%? There's only one time when you need to be worried about the number of megapixels in your camera, and that's when you're printing. If we look at this 10% increase in terms of printing, then instead of being able to make a high-quality (300 PPI) print with with a maximum width of 13 inches (33 cm), you'd be able to make one that's 14+¼ inches (36 cm) wide. Do you need both hands to count how many times you've printed one of your photos that big? Do you need any hands at all? If you are one of the one in a million peole that regularly prints your photos big enough to fill an iMax screen, then this 10% increase might come in handy. But for people who are normal, I reckon the difference between 13 inches and 14+¼ inches is minimal if anything, and it's not the kind of figure you want to use to decide which camera to buy.

Disclaimer: Cropping

It's important to realise that when you crop a photo on your computer, you are reducing the amount of information (i.e. pixels/megapixels) that the photo contains. Hence, if you commonly frame your photos poorly and find you are doing a lot of cropping on your computer then having a few extra pixels in your cropped photos may come in handy if you crop them really severely and still want to print them big. Even at this level, though, you'll still only be getting 10% more size (per dimension) than you would with 10 megapixels.

Copyright (c) 2008 Graham Lea. All rights reserved.

Wednesday, May 28, 2008

Why I Bought a Canon 40D

Decision Made

So, I went out and bought a Canon 40D. For those who haven't studied all the numbers, this is Canon's current "Prosumer" digital SLR; better than the Entry-Level 400D, not as good as the Semi-Pro 5D or the Pro-Only 1Dxspt Mark VI MDXR-9 (or whatever it's called now).

As I already own a couple of Canon lenses and have never won the lottery, it was really only a choice between the 40D and the 400D (or Rebel XTi as the yanks call it). A few people have asked me why I chose the 40D, especially considering the price difference (the 40D is about twice the price here in Australia), so I'm writing it down for the benefit of everyone considering buying a digital SLR.

You may find my decision factors somewhat whimsical, but I think they're important features that can be easily overlooked if you were to only concentrate on the technical specifications.

Reason 1: Metal Body

The body of the 40D is made of metal - magnesium alloy to be precise. The body of the 400D is made of plastic. Why is this my #1 reason? Simply put, if I'm going to spend around a thousand dollars on a piece of technology that's intended to be carried around, I'd like one that doesn't smash into pieces too easily.

I don't mind if my TV is only made of plastic because I only move it once every five years. But if I'm going to carry this thing around in a backpack, take it on holidays, picnics, bushwalks, citywalks and romantic walks along the beach, a plastic shell just isn't going to last the distance. It's obvious when you think about it.

Reason 2: Taller Grip

My hands are massive. It runs in the family. My pinkie (smallest finger - is this a universal term?) is thicker than most girls' thumbs. This creates all kinds of problems when it comes to things that need to fit on or around my hands, and a camera is one of those.

Many reviews have criticised the 400D's hand grip for being too small. Of course, Canon isn't about to change it (much) because the model's small form factor is one of its selling points. But, for me, it would be unbearable. I held the camera in a shop and it was already getting annoying. My third finger only just makes it onto the 400D grip and my pinkie was left hanging like I was sipping a cup of Twinings. But with the 40D, everything fits, although still only just, but it feels right. I can grip the grip rather than pinching it perilously. That's why it's so important to go into a store and have a play with any camera you intend to buy (before getting it on the internet for half the price).

Reason 3: Room to Grow

Though I've been taking photos for about ten years now, I'm still very much at the start of my photography journey (God willing). The 40D is more camera than I need right now. I'm still working on finding interesting things to shoot and selecting interesting compositions. But I've no doubt that, had I bought a 400D, pretty soon I would begin to feel limited by it and would want to upgrade to something more "serious".

Rather than go with the cheaper option and have to go through this whole buying process again in a couple of years, I figured it would be a better investment to buy the camera with all the features I don't need yet and grow into it as my experience broadens. I'm the kind of person who, when they buy something expensive, expects to keep it around for a decade or two, and I'm hoping my 40D will last that kind of distance.

Late-Discovered Reason: Buttons and Dials and Joysticks, Oh My!

This is something I only discovered about the 40D after getting it out of its box, but it would probably be the biggest difference that someone upgrading from a 400D would notice.

The top of the 40D is lined with buttons so that you can access almost all your exposure settings without ever seeing a menu. Add to that the quick command dial on the back which lets you spin through settings rather than employing your long-lost StreetFighter button-mashing skills. Then add to THAT the Multi-controller (= joystick + button in one) that lets you select the top-left AF point just by pressing up and to the left and makes panning through a zoomed photo almost as fun as playing Zelda!

Using this camera is FUN.

Copyright (c) 2008 Graham Lea. All rights reserved.